Table of Contents
- What is the Recovery Console?
- How to install the Recovery
Console to your hard drive
- How to start the Recovery
Console
- Remove the prompting of a
password
- How to use the Recovery Console
- Deleting the Recovery Console
What is the
Recovery
Console?
The Recovery Console is a special boot up method that
can be used to help fix problems that are preventing your Windows
installation from properly booting up into Windows. This method allows
you to access the files, format drives, disable and enable services, and
other tasks from a console prompt while the operating system is not
loaded. It is suggested that the Recovery Console is to only be used
only after Safe mode and the other standard startup options do not work.
I feel that the Recovery Console is also useful in other situations such
as removing malware files that start in both Safe mode and Standard Mode
and thus not allowing you to delete the infection.
This tutorial will guide you through the installation
of the Recovery Console and how to use it. For those who are familiar
with DOS or the
command
prompt, you will find the Recovery
Console to be very familiar. For those who are not comfortable with this
type of environment, I suggest you read through this primer in order to
get familiar with this type of interface:
Introduction to the Windows Command Prompt
How to install the Recovery
Console to your hard drive
I recommend that you install the Recovery Console
directly onto your computer so that if you need it in the future, it is
readily available. The Recovery Console only takes up approximately 7
megabytes so there is no reason why you should not have it installed in
case you need it.
To install the Recovery Console on your hard drive,
follow these steps:
- Insert the
Windows
XP
CD into your CD-ROM drive.
- Click the Start button.
- Click the Run menu option.
-
In the Open: field type
X:\i386\winnt32.exe /cmdcons , where
X is the
drive
letter for your CD reader, and
press the OK button. An image of this step can be found below:
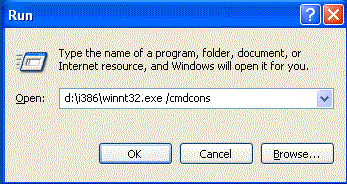
- After pressing the OK button a setup window will
appear similar to the one below.
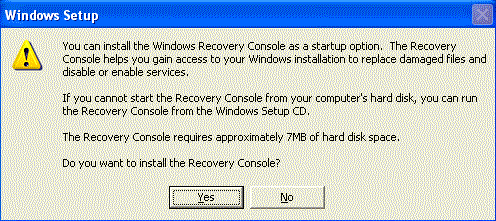
Simply press the Yes button to continue with
the installation of the Recovery Console. The setup program will
then attempt to do a Dynamic Update to make sure you have the latest
files as shown below.
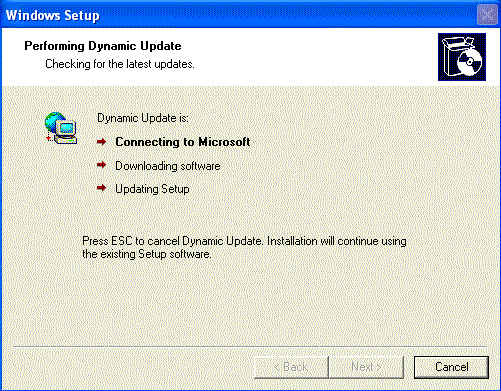
Simply allow it to continue and then when it is
finished, you will be presented with a screen similar to the one
below telling you so.
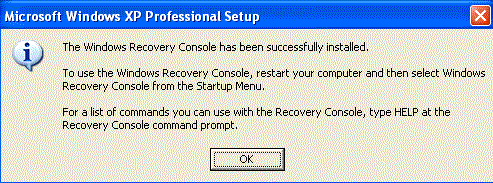
- Press the OK button and remove the CD from your
computer.
Now when you start your computer you will have an
option to start the Recovery Console.
How to start the
Recovery Console
To start the Recovery Console when it is installed on
your hard drive you would do the following:
- Reboot your computer and as Windows starts it
will present you with your startup options as shown in the figure
below.
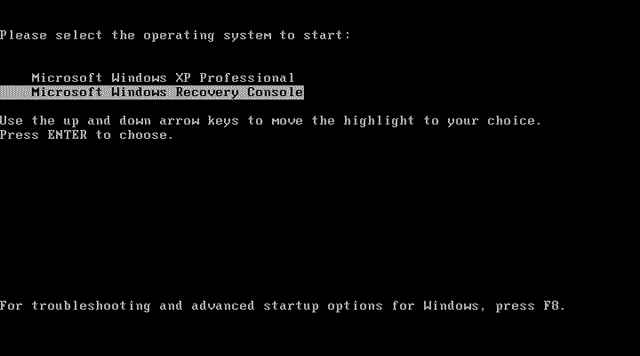
- With the arrows keys on your keyboard select the
option listed as Microsoft
Windows
Recovery Console
and press the enter key on your keyboard.
- The Recovery Console will start and ask you which
Windows installation you would like to log on to. If you have
multiple
Windows
installations, it will list each
one, and you would enter the number associated with the installation
you would like to work on and press enter. If you have just one
Windows installation, type 1 and press enter.
- It will then prompt you for the Administrator's
password. If there is no password, simply press enter. Otherwise
type in the password and then press enter. If you do not know your
password then see this.
- If you entered the correct password you will now
be presented with a C:\Windows>
prompt and you can start using the Recovery Console.
- Proceed to
How to use the Recovery Console.
To start the Recovery Console directly from the
Windows XP CD you would do the following:
- Insert the Windows XP cd in your computer.
- Restart your computer so you are booting off of
the CD.
- When the Welcome to
Setup screen appears, press the R button
on your keyboard to start the Recovery Console.
- The Recovery Console will start and ask you which
Windows installation you would like to log on to. If you have
multiple Windows installations, it will list each one, and you would
enter the number associated with the installation you would like to
work on and press enter. If you have just one Windows installation,
type 1 and press enter.
- It will then prompt you for the Administrator's
password. If there is no password, simply press enter. Otherwise
type in the password and then press enter. If you do not know your
password then see this.
- If you entered the correct password you will now
be presented with a C:\Windows>
prompt and you can start using the Recovery Console.
- Proceed to
How to use the Recovery Console.
Remove
the prompting of a password
When the Recovery Console starts it will ask for your
Administrator password before continuing. In many cases when you have XP
pre installed on your computer the Recovery Console will not recognize
your Administrator's password. In these situations it is possible to
edit a registry setting so that the Recovery Console does not ask for a
password. This setting works on both Windows XP Home and Pro editions.
To change this setting do the following:
- Click on the Start button.
- Click on the Run option
- Type regedit.exe in the open field and press the
OK button.
- Navigate to the
HKEY_LOCAL_MACHINE\SOFTWARE\Microsoft\WindowsNT\CurrentVersion\Setup\RecoveryConsole
- Change the value of SecurityLevel value to 1
- Close regedit
- Reboot your computer.
Now the Recovery Console will no longer
ask for a password.
How
to use the Recovery Console
Though the Recovery Console looks similar to a
standard command prompt it is not the same. Certain commands work, while
others do not, and there are new commands available to you. There is no
graphical interface, and all commands must be entered by typing them
into the console prompt with your keyboard and pressing enter. This may
be confusing for those who are not familiar with this type of interface,
but after doing a few commands it does becomes easier.
The following is a list of the available commands that
you can use in the Recovery Console. When using the recovery console you
can type help followed by the command to see a more detailed
explanation. For example: help attrib.
|
Command
|
Description
|
|
|
| Attrib |
Changes attributes on a file or directory. |
Batch
|
Executes commands that you specify in the
text file, Inputfile. Outputfile holds the output of the
commands. If you omit the Outputfile parameter, output appears
on the screen. |
|
Bootcfg |
Allows you to modify the Boot.ini file for
boot configuration and recovery. |
| CD |
(Chdir) Change directory. Operates only in
the system directories of the current Windows installation,
removable media, the root directory of any hard
disk
partition, or the local
installation sources. |
| Chkdsk |
Checks a disk for drive problems or
errors. The /p switch runs Chkdsk even if the drive is not
flagged as dirty. The /r switch locates bad sectors and recovers
readable information. This switch implies /p. Chkdsk requires
Autochk.
Chkdsk automatically looks
for Autochk.exe in the startup folder. If Chkdsk cannot find the
file in the startup folder, it looks for the Windows 2000 Setup
CD-ROM. If Chkdsk cannot find the installation CD-ROM, Chkdsk
prompts the user for the location of Autochk.exe. |
| Cls |
Clears the screen |
| Copy |
Copies one file to a target location. By
default, the target cannot be removable media, and you cannot
use wildcard characters. Copying a
compressed
file from the Windows 2000
Setup CD-ROM automatically decompresses the file. |
| Del |
(Delete) Deletes one file. Operates within
the system directories of the current Windows installation,
removable media, the root directory of any hard disk partition,
or the local installation sources. By default, you cannot use
wildcard characters. |
| Dir |
Displays a list of all files, including
hidden and system files. |
| Disable |
Disables a
Windows
system service or driver.
The variable service_or_driver is the name of the service or
driver that you want to disable. When you use this command to
disable a service, the command displays the service's original
startup type before it changes the type to SERVICE_DISABLED.
Note the original startup type so that you can use the enable
command to restart the service. |
| Diskpart |
Manages partitions on hard
disk
volumes. The /add option
creates a new partition. The /delete option deletes an existing
partition. The variable device is the device name for a new
partition (such as \device\harddisk0). The variable drive is the
drive letter for a partition that you are deleting (for example,
D). Partition is the partition-based name for a partition that
you are deleting, (for example: \device\harddisk0\partition1)
and can be used instead of the drive variable. The variable size
is the size, in megabytes, of a new partition. |
| Enable |
Enables a Windows system service or
driver. The variable service_or_driver is the name of the
service or driver that you want to enable, and start_type is the
startup type for an enabled service. The startup type uses one
of the following formats:
SERVICE_BOOT_START
SERVICE_SYSTEM_START
SERVICE_AUTO_START
SERVICE_DEMAND_START |
| Exit |
Quits the Recovery Console, and then
restarts the computer. |
| Expand |
Expands a compressed file. The variable
source is the file that you want to expand. By default, you
cannot use wildcard characters. The variable destination is the
directory for the new file. By default, the destination cannot
be removable media and cannot be read-only. You can use the
attrib command to remove the read-only attribute from the
destination directory. The option /f:filespec is required if the
source contains more than one file. This option permits wildcard
characters. The /y switch disables the overwrite confirmation
prompt. The /d switch specifies that the files will not be
expanded and displays a directory of the files in the source. |
| Fixboot |
Writes a new startup sector on the system
partition |
| Fixmbr |
Repairs the startup partition's master
boot code. The variable device is an optional name that
specifies the device that requires a new Master
Boot
Record. Omit this variable
when the target is the startup device. |
| Format |
Formats a disk. The /q switch performs a
quick format. The /fs switch specifies the file system. |
| Help |
If you do not use the command variable to
specify a command, help lists all the commands that the Recovery
Console supports. |
| Listsvc |
Displays all available services and drivers
on the computer. |
| Logon |
Displays detected installations of Windows
and requests the local Administrator password for those
installations. Use this command to move to another installation
or subdirectory. |
| Map |
Displays currently active device mappings.
Include the arc option to specify the use of Advanced RISC
Computing (ARC) paths (the format for Boot.ini) instead of
Windows device paths. |
| MD |
(Mkdir) Creates a directory. Operates only
within the system directories of the current Windows
installation, removable media, the root directory of any
hard
disk partition, or the local
installation sources. |
| More/Type |
Displays the specified text file on screen.
More will display a text file one page at a time, while Type
displays the entire text file at once. |
| Rd |
(Rmdir) Removes a directory. Operates only
within the system directories of the current Windows
installation, removable media, the root directory of any hard
disk partition, or the local installation sources. |
| Ren |
(Rename) Rename a file or directory.
Operates only within the system directories of the current
Windows installation, removable media, the root directory of any
hard disk partition, or the local installation sources. You
cannot specify a new drive or path as the target. |
| Set |
Displays and sets the Recovery Console
environment variables. |
| Systemroot |
Sets the current directory to %SystemRoot%. |
Deleting the Recovery Console
Warning:
To remove the Recovery Console you need to modify the Boot.ini file.
Modifying this file incorrectly can prevent your computer from starting
properly. Please only attempt this step if you feel comfortable doing
this.
To remove the Recovery Console from your hard drive
follow these steps:
- Double-click on My Computer and then double-click
on the drive you installed the Recovery Console (usually the C:
drive).
- Click on the Tools menu and select Folder
Options.
- Click on the View tab.
- Select Show hidden
files and folders and uncheck
Hide protected operating system files.
- Press the OK button.
- Now at the root folder delete the Cmdcons folder
and the Cmldr file.
- At the root folder, right-click the Boot.ini
file, and then click Properties.
- Click to clear the Read-only check box, and then
click the OK button.
- Click on Start, then Run and type Notepad.exe
c:\boot.ini in the Open: field and press the OK button.
- Remove the entry for the Recovery Console. It
will look similar to this:
C:\cmdcons\bootsect.dat="Microsoft Windows Recovery
Console" /cmdcons
Make sure you only delete that one entry.
- When you are done, close the notepad and save
when it asks.
- Right click again on the boot.ini file and select
Properties.
- Put a checkmark back in the Read-only checkbox
and then press the OK button.
The recovery console should now be removed from your
system.


![]() (MD5-> FB5A6E64B89FAA13E6B0C95ECB55C655)
(MD5-> FB5A6E64B89FAA13E6B0C95ECB55C655)