
Homebrew solid state disk (ssd) through floppy disk channel (fdd)!!!
Leading towards the space age
(photo from the early 90's)
Homebrewing your own Vintage XT Computer
Last update 14/7/2010
Preface
If you are reading this page you will be more likely fascinated about vintage computers. If you have some experience in building electronics projects then you may have thought that building a computer is not possible, it is just too complicated. But why do you think building your own computer from scratch is an impossible process, so that you just forget it? I am not talking about buying cards or parts and join them together, everyone does this more or less. I am talking about building such a computer hardware really from scratch. Buying the components (chips, resistors etc.), print the PCBs, program the BIOSes and join everything together. At first look it seems almost an impossible task! Well it's not so easy actually. Even the oldest computers are much more complex machines than the various electronic kits projects that are sold for the hobbyists today. But it is not impossible. With much patience and some electronic skills you can build your own PC-XT computer hardware. This page is intended to do most of the work for you and make you able to reproduce the hardware.
Where to start and why PC/XT
First of all, you have to decide about the requirements of the system. What do you want to do with it? You want it just for fun or do you plan to do something else with it? You will probably find that you will do it for fun, to impress your friends or for the memory of the good old days. Then you can start thinking about each part of the system. To save pain and cost, you are advised to find the simplest solution available, without compromising the abilities of the system. Also, can you find all the parts for the system or are they obsolete? Then you can proceed to the construction. This was actually all the brainstorming that I did before deciding which way should I follow.
Why not to build an older computer than the IBM PC?
As far as I have read on internet websites, since the early 70's there were great attempts for homebrew personal computers like Mark-8 and Altair machines which eventually, in a decade, lead to the IBM PC. Some of them used their own custom CPU made from discrete logic and today there are some very thoughtful guys that have made their own computers based on their own CPU designs. A real evolution! I wasn't even born back then and even if I had been born, I would probably not have an idea of what a computer would mean, in a country like Greece. I decided not to reproduce such an old machine but rather go for a newer computer. There were two main reasons for my decision:
I needed a system that would be able to run DOS (or other x86 based OS). There are huge lot of software that has been written for dos and run on the x86 architecture, still available on the internet today. This way it should be really useful for something else than just playing around with bits and machine code.
The complexity of the older machines, as far as concern the construction part, is not much less than the complexity of the IBM PC. In fact, I would carefully judge the IBM PC or some clones to be easier to make projects, since everything is build on a single double sided motherboard, and the complexity can be customized by building the cards you need later on.
Why not to build a newer computer than the IBM PC?
I decided to build the PC/XT because of various reasons. First of all for fun! Also, I needed a computer of that era, that would be able to run all my DOS programs. Then it needed to be hardware compatible with the ISA bus in order to be able to accept all the standard ISA cards. The 8-bit ISA bus of the PC/XT is more simple to build and control than the 16-bit ISA bus (and the PCI of course). Finally it is made of standard component packages (not SMD), so it can be easily reproduced. Another important consideration is that PC/XT like many older computers are built in double-sided PCB boards. They do not use the multi-layers PCBs that computers today use, so their PCBs are easy and cheap to build by an electronics lab or by yourself!
There are two computers of this era of interest, the PC, which was the first IBM personal computer and the XT, which was it's successor. I have chosen to build the XT because of it's better performance and because it has 8 ISA slots at the same complexity as the PC. After judging all the considerations above, I decided that the XT could be the simplest computer for the homebrewer to build, and at the same time still useable today if you are really open minded about computers and software.
How this can be done
If you are an advanced computer hardware engineer and you have lots of time, you may start designing your own PC-XT computer. Personally I do not, so another solution has to be found. A good start is to find some old issues of electronics and computer magazines. They sometimes publish complete projects of computer hardware. I have found some of them that present various cards projects but none of them has a PC-XT motherboard project. If you find some complete projects, give them a try. But if you cannot, then do not be disappointed, as there is another solution.
This solution is the way I prefer, the reverse engineering. It needs a lot of patience but the result is guaranteed. Instead of designing your own hardware why not make a clone of a commercial product? Many companies did clone the IBM PC back then. As I said earlier, find the simplest solution available. Of course there are no schematics and PCB patterns available so in my case I obtained old PC-XT clone boards and performed some reverse engineering to them. I chosen among several boards to find the most minimal, with the less and easier to find components on it, in order to be easier to reproduce it. The procedure to make a clone of every PCB in the computer can me summarized in the next steps:
Find a relatively small and simple card/motherboard.
Use a good quality digital camera and take as many close up photographs of the assembled card and components on it.
Use an IC reader/programmer and keep a backup of the BIOS ROM or any other programmed IC to HEX files.
Then you need to unsolder all the pars on the card. Always ensure you have obtained backups, as you will probably blow off the microchips during this process.
Clean the card with a nails-paint remover (without oil) or any suitable alcohol.
Then put the disassembled card into a scanner and scan it from both sides. Save the images in .BMP format.
Then use your patience and any good image editing software to produce the PCB pattern in black and white from the scanned images.
Carefully measure the dimensions of the original card and write them down in the PCB pattern files.
Finally, use the close up photographs you have taken and the PCB pattern files, to produce the components placement files.
It is a painful process that needs a lot of patience, but hey! If you do it once for a board, won't need to do it again, plus if you make your PCB patterns available on the net, then you can help many others save huge lot of time.
Building the PC-XT computer
Ok, PC-XTs are old machines, so you cannot do what you want to do in the same way you do it with new computers. But you probably already know this. Nevertheless, you can make some decisions that will boost up the performance and the usability of these old computers.
The X-DOS is a nice software project that I develop, suitable to make the most out of your vintage computer, so let's talk about the hardware.
Solid state disk
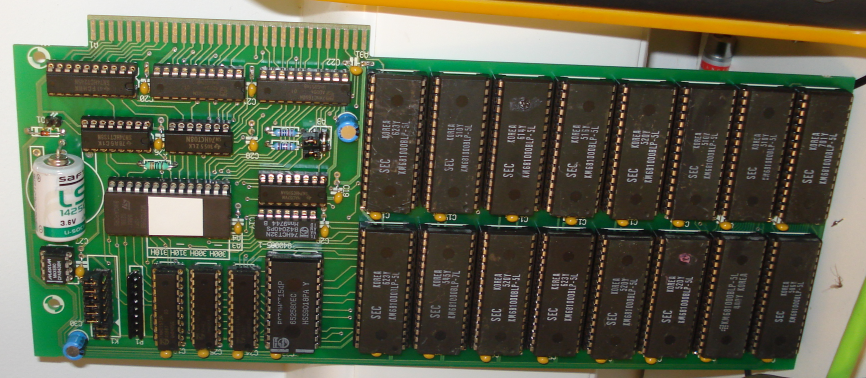
The completed SSD
Most of these computers do not accept hard disks but they use only floppy disks to load the OS and programs into RAM. Some of them, like the XT, used very old hard disks that are obsolete and cannot build by the homebrewer. Floppy disk drives are very slow and sensitive to mechanical interference, dust and magnetic fields. Unfortunately, the floppy is the most commonly used and all of our old programs are in floppies. Thus, you have to use floppy drives, but for the OS (which is probably most of the time used) there is a better solution which greatly boosts up speed, the solid state floppy disk. I have found this project on an old issue of Elektor magazine. It is an 8-bit ISA bus card and it is very similar to the so called RAM page cards, but this has an onboard battery to keep the data into RAM and a BIOS to emulate the floppy drive so you can boot DOS from it. It even has a write protect switch to keep your OS safe in it and a LED to show the loading state. I was very lucky to find the original BIOS program for it. Because the article is in Greek, if you decide to build this and you need more info about how to format and boot it please email me on http://www.microwave.gr/giannopk. I am writing the basic installation information below for your convenience. This has been copied from the magazine and I found it to cause some problems, so after this description I am giving you another way of install the SSD.
In order to install the SSD into DOS you have to do the
following:
First, connect the right address jumpers (A3, A4) to set the
address of the card. The address without jumpers is 318H.
Then, you have to
let the OS know that an SSD has been installed. You have to write the disk
information into the CONFIG.SYS. To do this, type
drivparm=/D:00/F:07/H:2/S:xx/T80 to install it as a drive A or
drivparm=/D:01/F:07/H:2/S:xx/T80 to install it as a drive B. Where "xx" you have
to type the number 18 for 1.44Mb disc emulation or 36 for 2.88Mb disc
emulation.
If your computer has already A and B drive you have to start a DOS
driver. Just add the next line into CONFIG.SYS. Device=\<DOS
directory>\driver.sys/D:nr/F:07/H:2/S:xx/T:80
This can get values from 0
to 3.
The next thing to do is to format the SSD using the /F parameter of the
format command. Type FORMAT A:F: 1440 for 1.44MB on drive A, FORMAT A:F: 2880
for 2.88MB on drive A, FORMAT B:F: 1440 for 1.44MB on drive B or FORMAT B:F:
2880 for 2.88MB on drive B. Note in these commands you have to add the /S
parameter, to make the disk bootable.
I have managed to install the drive
as drive B but I have not yet managed to make it bootable, so right now I boot
from a floppy and then set the system to read the OS from the SSD by assigning
drive A to be equal to B, so the floppy is no more needed. Maybe it is something
with my CONFIG.SYS or a conflict with the floppy disc controller, I have to
figure it out but if you can provide some feedback it will be greatly accepted.
I should expect the SSD to boot the OS without the need of the boot floppy
because it has an onboard bios. Here is all you need to build the disc.
Now I provide you with another way of installing the SSD. Just download floppydos.zip and read the instructions in the README.TXT file.
BIOS
(HEX) Provided as is for
educational purposes only. Copyright protected.
BIOS
(BIN) Provided as is for
educational purposes only. Copyright protected.
Elektor
magazine article in Greek
Elektor magazine article in English part 1 and part 2
Elektor kit
codes
Pricelist
PCB
upper layer
PCB
lower layer
Components
placement
Components
list Warning! There is an error in the components list. The pull-up resistor
network R1 must be 10K and NOT 10 ohms.
Schematic
Update! Darren Lue Choy has produced some very nice artwork in the two compressed files below, including some changes in the original board.
Attached in 2010_07_09_SSD_reference.zip are the processed reference images in PNG and SVG format. Images were processed using Inkscape (Potrace), Notepad++ and Excell.
Attached in 2010_07_09_SSD_clone.zip
is the resulting clone design in Eagle, PDF and PNG format. Clone was drawn
using Eagle 5.
Floppy disk controller
To load your own programs into RAM you need floppy drives. The floppy controller that I will try to replicate has it's own onboard BIOS and it does not need drivers. It can also support all types of floppy drives, 360Kb, 720Kb, 1.2Mb, 1.44Mb. It is the PII-151B controller from DTK COMPUTER, INC.
Settings and
layout
BIOS
(HEX) Provided as is for
educational purposes only. Copyright protected.
BIOS
(BIN) Provided as is for
educational purposes only. Copyright protected.
Information
Under Construction
Floppy disk drives
I wanted to have both 5+1/4 inch and 3+1/2 inch floppy drives because my old programs were in 5+1/4 and my new ones in 3+1/2 so I wanted the computer to be compatible with both. The 1.44Mb floppy drive is the only easy way to transfer programs from newer computers to old ones (there was not such thing as USB flash drive back then), so this has to be used. I also use the 5+1/4 drive to keep the vintage feeling of the computer but I have chosen the 1.2Mb capacity in order to save floppies. It still can read and write other 5+1/4 disk capacities, like 360Kb ones. If you want to format a 5+1/4 floppy of 360Kb using this drive you just have to add the parameter /F:360 to the format command (for example A:\format/F:360 B:).
Under Construction
Motherboard
Under Construction
Graphics card
Under Construction
Network card
Under Construction
I/O interface card
Under Construction
Power supply
Under Construction
Acoustic Modem interface
I do not know if acoustic modems can still be used to with modern ISPs so I need some feedback on this. I have seen someone on the net that has used a commercial acoustic modem to connect to the internet, but it is not clear to me if he dials on an ISP or if he has setup a private service to dial to. Nevertheless I think that you can still use the acoustic coupler to transfer data between two remote computers in the world. Just make a call to the remote telephone of your friend using your telephone. Speak to him to let him know that you want to transfer data. Once you are both ready to transfer data, put your telephone microphone/speaker onto the acoustic coupler interface. Then you can start the data exchange.
The acoustic modem interface is an external part of the PC-XT. There is no need to reserve another valuable 8-bit card interface of the PC, as it is not controlled by the PC, so it only needs to connect to the COM port of it, to be able to transfer serial data by the use of acoustic tones and FSK modulation. I was looking for some time to find any information on an easy to build acoustic coupler until Max Klinger provided this valuable information. Currently I have found two such single chip modems that can be easily build if you find the vintage chips.
TCM3105NL
single chip modem
74HC942 single
chip modem
Under Construction
Disclaimer notice: Information and files in this
page provided as is. You are free to copy any images and data in this page
provided that you do not alter their content and you clearly define their
source.
Copyright
� 2009-2010 - All Rights reserved